Google Cloud Platform을 이용한 NAS 시스템 구축 의 아홉째 글입니다.
앞선글에서 Nginx, PHP-fpm, MariaDB까지 모두 설치완료하셨을겁니다.
이제 이것들을 이용해서 nextcloud를 설치해보도록 하겠습니다.
nextcloud 최신버전 다운로드
먼저 아래 공식홈페이지에 들어가서 최신버전 .tar.bz2의 링크주소를 복사해줍니다.

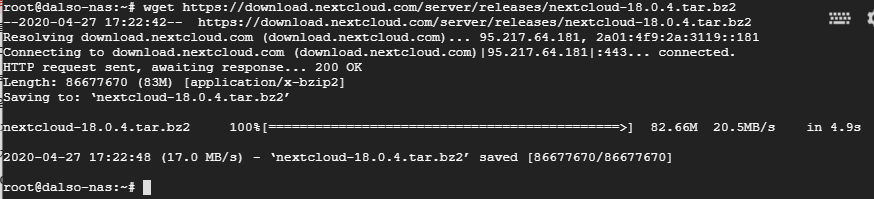
그리고 VM 인스턴스에 SSH로 접근후 wget으로 파일을 다운로드 받아줍니다.
wget https://download.nextcloud.com/server/releases/nextcloud-18.0.4.tar.bz2
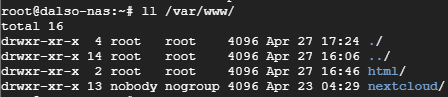
다운로드가 완료되면 아래명령어로 압축을 풀어줍니다.
tar -xjvf nextcloud-18.0.4.tar.bz2 -C /var/www
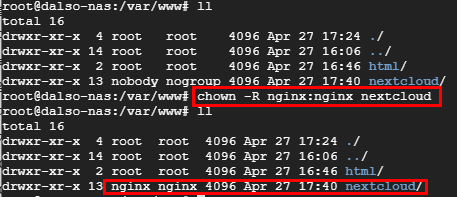
그리고 권한 설정을 해줘야합니다.
chown -R nginx:nginx /var/www/nextcloud
이제 nginx의 conf 파일을 다시 변경해줘야합니다. 내용을 추가해야하나.. 헷갈릴수도있으니 삭제 후 복붙해주세요.
rm -rf /etc/nginx/conf.d/default.conf
vim /etc/nginx/conf.d/default.conf
아래에서 cloud.example.com 은 도메인 이름으로 변경해주셔야합니다.
ssl key도 주의.
upstream php-handler {
    server 127.0.0.1:9000;
    #server unix:/var/run/php/php7.4-fpm.sock;
}

server {
    listen 80;
    listen [::]:80;
    server_name cloud.example.com;

    # Enforce HTTPS
    return 301 https://$server_name$request_uri;
}

server {
    listen 443      ssl http2;
    listen [::]:443 ssl http2;
    server_name cloud.example.com;

    # Use Mozilla's guidelines for SSL/TLS settings
    # https://mozilla.github.io/server-side-tls/ssl-config-generator/
    ssl_certificate     /etc/ssl/nginx/cloud.example.com.crt;
    ssl_certificate_key /etc/ssl/nginx/cloud.example.com.key;

    # HSTS settings
    # WARNING: Only add the preload option once you read about
    # the consequences in https://hstspreload.org/. This option
    # will add the domain to a hardcoded list that is shipped
    # in all major browsers and getting removed from this list
    # could take several months.
    #add_header Strict-Transport-Security "max-age=15768000; includeSubDomains; preload;" always;

    # set max upload size
    client_max_body_size 512M;
    fastcgi_buffers 64 4K;

    # Enable gzip but do not remove ETag headers
    gzip on;
    gzip_vary on;
    gzip_comp_level 4;
    gzip_min_length 256;
    gzip_proxied expired no-cache no-store private no_last_modified no_etag auth;
    gzip_types application/atom+xml application/javascript application/json application/ld+json application/manifest+json application/rss+xml application/vnd.geo+json application/vnd.ms-fontobject application/x-font-ttf application/x-web-app-manifest+json application/xhtml+xml application/xml font/opentype image/bmp image/svg+xml image/x-icon text/cache-manifest text/css text/plain text/vcard text/vnd.rim.location.xloc text/vtt text/x-component text/x-cross-domain-policy;

    # Pagespeed is not supported by Nextcloud, so if your server is built
    # with the `ngx_pagespeed` module, uncomment this line to disable it.
    #pagespeed off;

    # HTTP response headers borrowed from Nextcloud `.htaccess`
    add_header Referrer-Policy                      "no-referrer"   always;
    add_header X-Content-Type-Options               "nosniff"       always;
    add_header X-Download-Options                   "noopen"        always;
    add_header X-Frame-Options                      "SAMEORIGIN"    always;
    add_header X-Permitted-Cross-Domain-Policies    "none"          always;
    add_header X-Robots-Tag                         "none"          always;
    add_header X-XSS-Protection                     "1; mode=block" always;

    # Remove X-Powered-By, which is an information leak
    fastcgi_hide_header X-Powered-By;

    # Path to the root of your installation
    root /var/www/nextcloud;

    # Specify how to handle directories -- specifying `/index.php$request_uri`
    # here as the fallback means that Nginx always exhibits the desired behaviour
    # when a client requests a path that corresponds to a directory that exists
    # on the server. In particular, if that directory contains an index.php file,
    # that file is correctly served; if it doesn't, then the request is passed to
    # the front-end controller. This consistent behaviour means that we don't need
    # to specify custom rules for certain paths (e.g. images and other assets,
    # `/updater`, `/ocm-provider`, `/ocs-provider`), and thus
    # `try_files $uri $uri/ /index.php$request_uri`
    # always provides the desired behaviour.
    index index.php index.html /index.php$request_uri;

    # Default Cache-Control policy
    expires 1m;

    # Rule borrowed from `.htaccess` to handle Microsoft DAV clients
    location = / {
        if ( $http_user_agent ~ ^DavClnt ) {
            return 302 /remote.php/webdav/$is_args$args;
        }
    }

    location = /robots.txt {
        allow all;
        log_not_found off;
        access_log off;
    }

    # Make a regex exception for `/.well-known` so that clients can still
    # access it despite the existence of the regex rule
    # `location ~ /(\.|autotest|...)` which would otherwise handle requests
    # for `/.well-known`.
    location ^~ /.well-known {
        # The following 6 rules are borrowed from `.htaccess`

        rewrite ^/\.well-known/host-meta\.json  /public.php?service=host-meta-json  last;
        rewrite ^/\.well-known/host-meta        /public.php?service=host-meta       last;
        rewrite ^/\.well-known/webfinger        /public.php?service=webfinger       last;
        rewrite ^/\.well-known/nodeinfo         /public.php?service=nodeinfo        last;

        location = /.well-known/carddav     { return 301 /remote.php/dav/; }
        location = /.well-known/caldav      { return 301 /remote.php/dav/; }

        try_files $uri $uri/ =404;
    }

    # Rules borrowed from `.htaccess` to hide certain paths from clients
    location ~ ^/(?:build|tests|config|lib|3rdparty|templates|data)(?:$|/)  { return 404; }
    location ~ ^/(?:\.|autotest|occ|issue|indie|db_|console)              { return 404; }

    # Ensure this block, which passes PHP files to the PHP process, is above the blocks
    # which handle static assets (as seen below). If this block is not declared first,
    # then Nginx will encounter an infinite rewriting loop when it prepends `/index.php`
    # to the URI, resulting in a HTTP 500 error response.
    location ~ \.php(?:$|/) {
        fastcgi_split_path_info ^(.+?\.php)(/.*)$;
        set $path_info $fastcgi_path_info;

        try_files $fastcgi_script_name =404;

        include fastcgi_params;
        fastcgi_param SCRIPT_FILENAME $document_root$fastcgi_script_name;
        fastcgi_param PATH_INFO $path_info;
        fastcgi_param HTTPS on;

        fastcgi_param modHeadersAvailable true;         # Avoid sending the security headers twice
        fastcgi_param front_controller_active true;     # Enable pretty urls
        fastcgi_pass php-handler;

        fastcgi_intercept_errors on;
        fastcgi_request_buffering off;
    }

    location ~ \.(?:css|js|svg|gif)$ {
        try_files $uri /index.php$request_uri;
        expires 6M;         # Cache-Control policy borrowed from `.htaccess`
        access_log off;     # Optional: Don't log access to assets
    }

    location ~ \.woff2?$ {
        try_files $uri /index.php$request_uri;
        expires 7d;         # Cache-Control policy borrowed from `.htaccess`
        access_log off;     # Optional: Don't log access to assets
    }

    location / {
        try_files $uri $uri/ /index.php$request_uri;
    }
}
이제 다시 사이트를 접속해보면 아래처럼 잘 나오는걸 확인 할 수 있습니다.

Nextcloud DB생성하기
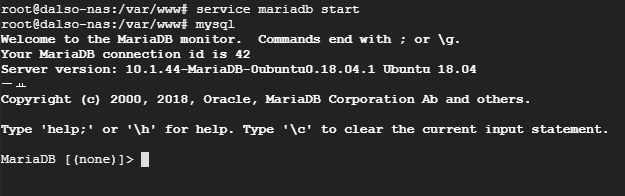
이제 설치하기전에 마지막으로 Nextcloud 전용 db를 만들어주도록 하겠습니다.
터미널로 접속 후 service mariadb start로 실행후mysql 명령어로 DB에 접속합니다.
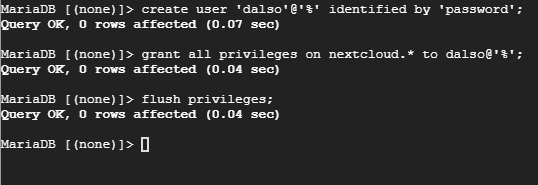
nextcloud db 생성 및 유저생성
여기서 mysql 문법까지 설명하면.. 글이 너무 길어지기 때문에 명령어 입력으로 설명을 대체하겠습니다.
복붙하면 오류가 날수있으니 여긴 타이핑을 추천합니다.
create database nextcloud;
create user ‘dalso’@’%’ identified by ‘password’;
grant all privileges on nextcloud.* to dalso@’%’;
flush privileges;

Nextcloud Install
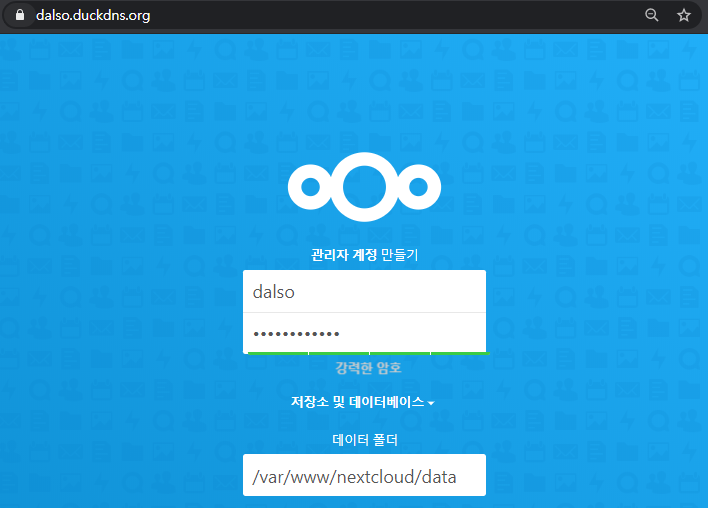
이제 웹으로 가서 설치를 마저하도록 하겠습니다.
먼저, 관리자로 사용될 계정정보를 입력해줍니다.
방금전에 생성한 DB의 정보를 입력해줍니다. 위의 코드에서 password는 ‘password’입니다.
host가 localhost인것은 mariadb가 기본서버에 설치되어있기때문입니다.
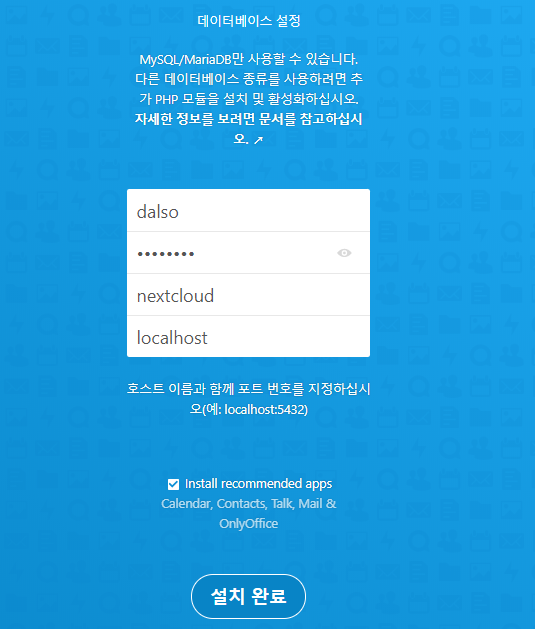
설치완료를 누르면 천천히 설치가 시작됩니다.
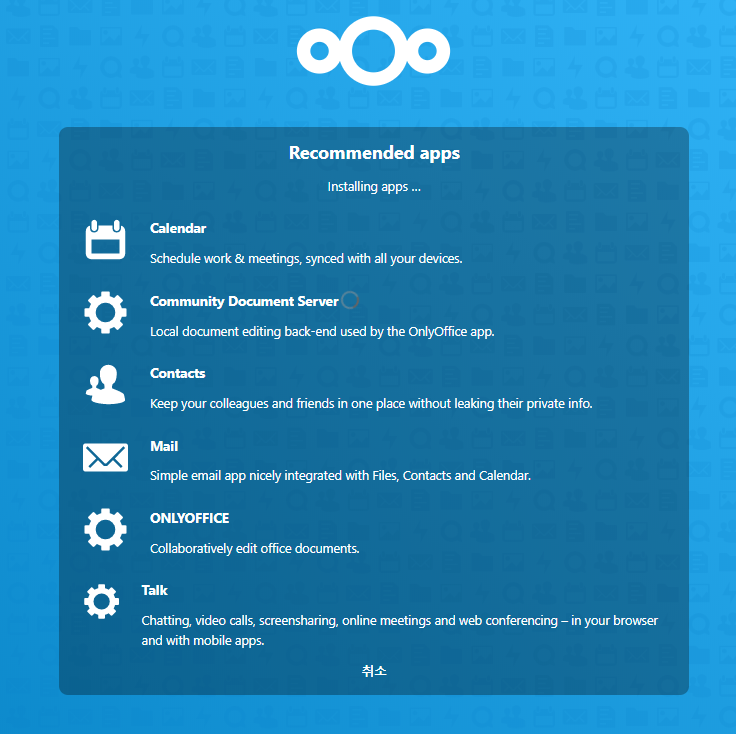
설치가 완료 됐습니다.

진행 순서
- [GCP]VM인스턴스 생성하기(Ubuntu OS)
- [GCP]VM 인스턴스 고정 IP할당 및 Nginx 설치.
- [GCP]VM(ubuntu OS) Docker 설치하기.(portainer 추가)
- [GCP]서비스 운영을 위한 무료 도메인 발급받기
- [GCP]Docker를 이용한 Torrent 서비스 구축하기.
[GCP]Docker를 이용한 Nextcloud 서비스 구축하기.(MariaDB 추가)[GCP]Nextcloud 설정 변경하기 및 도메인 SSL,reverse proxy 적용하기.- [GCP]Nextcloud 설치를 위한 PHP, MariaDB 설치하기 + SSL 적용.
- [GCP]LEMP 스택으로 Nextcloud 구축.
- [GCP]Nextcloud 최적화하기(nginx,php-fpm 설정)
- [GCP]Docker를 이용한 Jellyfin 서비스 구축하기.
- [GCP]Docker를 이용한 PLEX 서비스 구축하기.
- [GCP]Nextcloud를 이용해 Webdav 사용하기.
혹시 nextcloud 압축을 해제하고 nginx 설정을 변경하라고 하셨는데 어떻게 변경하는지 알수 있을까요?
헛..그부분이 빠져있네요.. 금방 추가해서 넣도록 하겠습니다!
감사합니다!
바쁘신와중에도 카톡 답장 해주시고 감사합니다 🙂
이번주는 제가 일이많아서 ㅠㅠ제대로 답변도 못드렸는데 방문감사합니다.
수정내용은 추후에 반영할게요!
혹시 nextcloud 압축을 해제하고 nginx 설정을 변경하는 부분이 언제쯤 업데이트 되는지 알수 있을까요?
다른부분은 모두 완료했는데 이곳에서 막히고 있네요ㅠㅠ
죄송합니다 ㅠㅠ 일떄문에 늦게봐서 지금 업데이트 완료했습니다.
내용중에 도메인과 ssl key부분만 사용하시는 경로로 하고 webroot도 주의해서 수정해주시면됩니다.
바쁘실텐데 도와주셔서 정말 감사드립니다!:)
안녕하세요!
nextcloud 설치후 nginx를 재시작 하는 과정에서 아래와 같은오류가 발생합니다.
Job for nginx.service failed because the control process exited with error code.
See “systemctl status nginx.service” and “journalctl -xe” for details.
systemctl status nginx.service를 입력해 확인해보면 아래와 같은 오류가 발생합니다.
● nginx.service – nginx – high performance web server
Loaded: loaded (/lib/systemd/system/nginx.service; enabled; vendor preset: enabled)
Active: failed (Result: exit-code) since Sat 2020-11-28 00:24:03 KST; 53s ago
Docs: http://nginx.org/en/docs/
Process: 20231 ExecStop=/bin/sh -c /bin/kill -s TERM $(/bin/cat /var/run/nginx.pid) (code=exited, status=0/SUCCES
Process: 20239 ExecStart=/usr/sbin/nginx -c /etc/nginx/nginx.conf (code=exited, status=1/FAILURE)
Main PID: 20146 (code=exited, status=0/SUCCESS)
Nov 28 00:24:03 nextcloud systemd[1]: Stopped nginx – high performance web server.
Nov 28 00:24:03 nextcloud systemd[1]: Starting nginx – high performance web server…
Nov 28 00:24:03 nextcloud nginx[20239]: nginx: [emerg] cannot load certificate “/etc/ssl/nginx/xxx.cr
Nov 28 00:24:03 nextcloud systemd[1]: nginx.service: Control process exited, code=exited status=1
Nov 28 00:24:03 nextcloud systemd[1]: nginx.service: Failed with result ‘exit-code’.
Nov 28 00:24:03 nextcloud systemd[1]: Failed to start nginx – high performance web server.
그리고 journalctl -xe를 입력하면 아래와 같이 표시됩니다.
— Support: http://www.ubuntu.com/support
—
— Unit nginx.service has begun starting up.
Nov 28 00:18:58 nextcloud systemd[1]: nginx.service: Can’t open PID file /var/run/nginx.pid (yet?) after start: No
Nov 28 00:18:58 nextcloud systemd[1]: Started nginx – high performance web server.
— Subject: Unit nginx.service has finished start-up
— Defined-By: systemd
— Support: http://www.ubuntu.com/support
—
— Unit nginx.service has finished starting up.
—
— The start-up result is RESULT.
Nov 28 00:22:17 nextcloud systemd-networkd[388]: ens4: Configured
Nov 28 00:24:03 nextcloud systemd[1]: Stopping nginx – high performance web server…
— Subject: Unit nginx.service has begun shutting down
— Defined-By: systemd
이 경우 어떻게 해야하는지 도와주실수 있으신가요?
nginx 프로세스가 떠있어서 정상적으로 실행이 안되는거같은데 재부팅해도 증상이 똑같을까요??
cat /var/log/nignx/쪽에 error.log에는 어떤로그가나올까요
어…. 혹시 설정파일중에 ssl_certificate /etc/ssl/nginx/cloud.example.com.crt;
ssl_certificate_key /etc/ssl/nginx/cloud.example.com.key; 부분이 계속 오류에 걸리는데
이게 뭔가요? 제가 초보라….
안녕하세요. SSL인증서의 위치로 바꿔주셔야합니다.
예제로 적은 cloud.example.com 에서 발급받은 인증서 도메인으로요
안녕하세요!
다름이 아니라 혹시 ‘https://blog.dalso.org/google-cloud-platform-2/nas-project/9151’해당 게시글에서 ‘이지은’이라는 이름으로 작성된 댓글과 해당 댓글까지 지워주실수 있으신가요?
실명이 공개되는것까지는 몰랐는데 공개되어 버렸네요ㅠㅠ
안녕하세요. 해당 댓글들 모두 비실명처리완료했습니다!
여러번 귀찮게 해 드려 죄송합니다ㅠㅠ
윗 댓글에 적힌 실명과 위 질문 글 중 33주소를 마스킹 처리 해 주실수 있으신가요? 해당 댓글에 달린 주소와 이름도 마스킹 부탁드립니다ㅠㅠ😥
넵 마스킹처리했습니다!