Google Cloud Platform을 이용한 NAS 시스템 구축 의 일곱번째 글입니다.
앞서 nextcloud를 설치했는데 설정변경이 조금 필요합니다. 기본적으로 ssl이 적용되어있는데.. 이러면 계획해놓은대로 안되기 때문에 443-> 80으로 변경시켜줄 예정입니다.
기본 도메인에 SSL 적용후 reverse proxy로 nextcloud 사용 예정입니다.
간단하게 컨피그 수정 후에 컨테이너 설정 변경하고 하면 될거같습니다.
그리고 나서 기본설치되어있는 nginx에 SSL 인증서까지 부여해보도록하겠습니다.
진행 순서는 아래와 같습니다.
nginx config수정(nextcloud docker) -> container 설정 수정 -> 무료도메인에 SSL 적용하기
nginx config수정(nextcloud docker)
먼저, VM인스턴스에 SSH로 터미널 접근을 해줍니다.
그리고 config 변경을 위해 vim을 설치해주도록 하겠습니다.
apt install vim

그리고 nextcloud nginx의 기본 config를 지우고 새롭게 작성해줍니다.
rm -rf /data/nextcloud/config/nginx/site-confs/default
vim /data/nextcloud/config/nginx/site-confs/default
내용은 아래내용을 복사 붙여넣기하면됩니다.
upstream php-handler {
server 127.0.0.1:9000;
}
server {
listen 80;
listen [::]:80;
server_name _;
# Add headers to serve security related headers
# Before enabling Strict-Transport-Security headers please read into this
# topic first.
#add_header Strict-Transport-Security "max-age=15768000; includeSubDomains; preload;" always;
#
# WARNING: Only add the preload option once you read about
# the consequences in https://hstspreload.org/. This option
# will add the domain to a hardcoded list that is shipped
# in all major browsers and getting removed from this list
# could take several months.
add_header X-Content-Type-Options nosniff;
add_header X-XSS-Protection "1; mode=block";
add_header X-Robots-Tag none;
add_header X-Download-Options noopen;
add_header X-Frame-Options "SAMEORIGIN";
add_header X-Permitted-Cross-Domain-Policies none;
add_header Referrer-Policy no-referrer;
fastcgi_hide_header X-Powered-By;
root /config/www/nextcloud/;
# display real ip in nginx logs when connected through reverse proxy via docker network
set_real_ip_from 172.0.0.0/8;
real_ip_header X-Forwarded-For;
location = /robots.txt {
allow all;
log_not_found off;
access_log off;
}
location = /.well-known/carddav {
return 301 $scheme://$host:$server_port/remote.php/dav;
}
location = /.well-known/caldav {
return 301 $scheme://$host:$server_port/remote.php/dav;
}
client_max_body_size 10G;
fastcgi_buffers 64 4K;
gzip on;
gzip_vary on;
gzip_comp_level 4;
gzip_min_length 256;
gzip_proxied expired no-cache no-store private no_last_modified no_etag auth;
gzip_types application/atom+xml application/javascript application/json application/ld+json application/manifest+json application/rss+xml application/vnd.geo+json application/vnd.ms-fontobject application/x-font-ttf application/x-web-app-manifest+json application/xhtml+xml application/xml font/opentype image/bmp image/svg+xml image/x-icon text/cache-manifest text/css text/plain text/vcard text/vnd.rim.location.xloc text/vtt text/x-component text/x-cross-domain-policy;
location / {
rewrite ^ /index.php;
}
location ~ ^\/(?:build|tests|config|lib|3rdparty|templates|data)\/ {
deny all;
}
location ~ ^\/(?:\.|autotest|occ|issue|indie|db_|console) {
deny all;
}
location ~ ^\/(?:index|remote|public|cron|core\/ajax\/update|status|ocs\/v[12]|updater\/.+|oc[ms]-provider\/.+)\.php(?:$|\/) {
fastcgi_split_path_info ^(.+?\.php)(\/.*|)$;
set $path_info $fastcgi_path_info;
try_files $fastcgi_script_name =404;
include /etc/nginx/fastcgi_params;
fastcgi_param SCRIPT_FILENAME $document_root$fastcgi_script_name;
fastcgi_param PATH_INFO $path_info;
#fastcgi_param HTTPS on;
fastcgi_param modHeadersAvailable true;
fastcgi_param front_controller_active true;
fastcgi_pass php-handler;
fastcgi_intercept_errors on;
fastcgi_request_buffering off;
}
location ~ ^\/(?:updater|oc[ms]-provider)(?:$|\/) {
try_files $uri/ =404;
index index.php;
}
location ~ \.(?:css|js|woff2?|svg|gif|map)$ {
try_files $uri /index.php$request_uri;
add_header Cache-Control "public, max-age=15778463";
# Add headers to serve security related headers
# Before enabling Strict-Transport-Security headers please read into this
# topic first.
#add_header Strict-Transport-Security "max-age=15768000; includeSubDomains; preload;" always;
#
# WARNING: Only add the preload option once you read about
# the consequences in https://hstspreload.org/. This option
# will add the domain to a hardcoded list that is shipped
# in all major browsers and getting removed from this list
# could take several months.
add_header X-Content-Type-Options nosniff;
add_header X-XSS-Protection "1; mode=block";
add_header X-Robots-Tag none;
add_header X-Download-Options noopen;
add_header X-Frame-Options "SAMEORIGIN";
add_header X-Permitted-Cross-Domain-Policies none;
add_header Referrer-Policy no-referrer;
access_log off;
}
location ~ \.(?:png|html|ttf|ico|jpg|jpeg|bcmap)$ {
try_files $uri /index.php$request_uri;
access_log off;
}
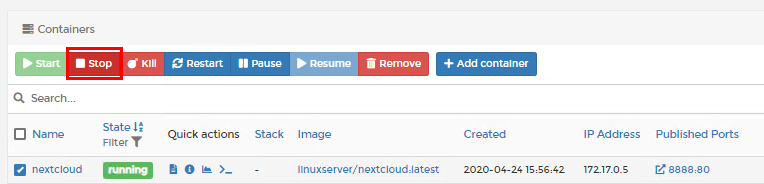
} 그리고 portainer의 컨테이너 페이지에가서 nextcloud 컨테이너를 종료시켜줍니다.
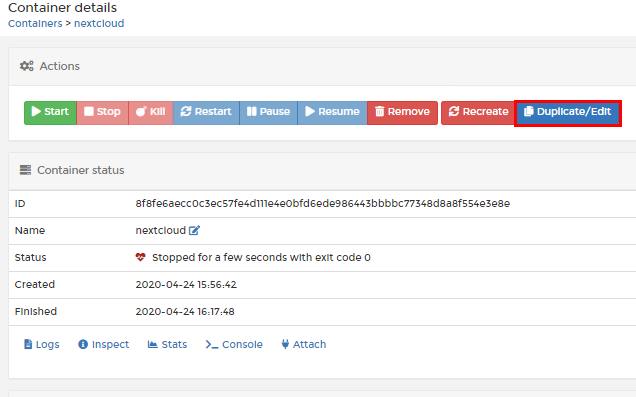
그리고 nextcloud를 눌러서 컨테이너 설정을 변경해줍니다.
기존 port 443 -> 80으로 변경하면됩니다.
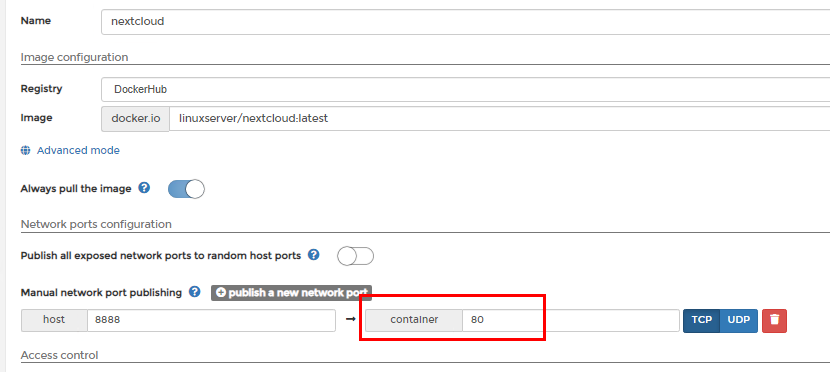
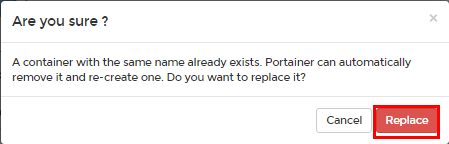
이것만 변경하고 Deploy
정상적용이 됐는지 확인하기위해서는 웹브라우저로 접속해보면 됩니다.
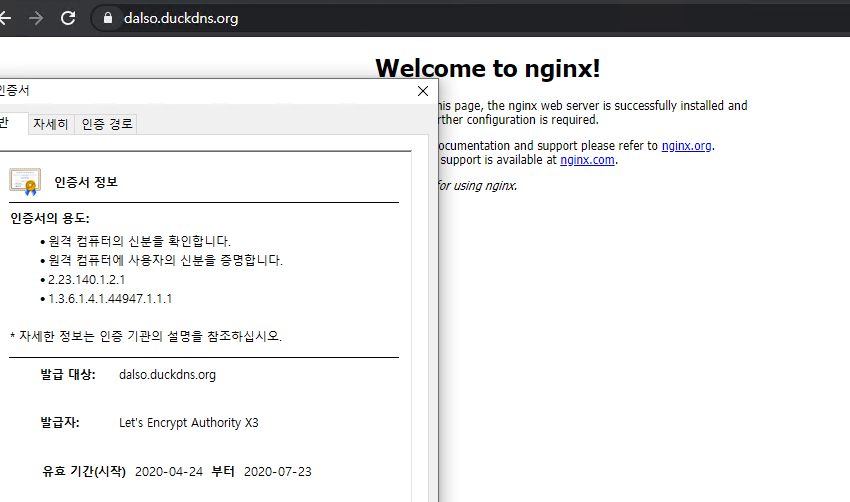
SSL 인증서 발급
위글을 보고 진행하시되 인증서 발급 및 암호키까지만 받고 다시 이쪽으로 와주시면됩니다.
nginx 설정수정
이부분도 그냥 default.conf를 삭제하고 아래 코드를 복붙하시는걸 추천합니다.
위 설정까지 함께 적용한 코드입니다. 코드에서 [도메인] 부분만자신의 도메인으로 변경하면 됩니다.
ex) [도메인] -> dalso.duckdns.org
rm -rf /etc/nginx/conf.d/default.conf
vim /etc/nginx/conf.d/default.conf
upstream nextcloud {
        server 127.0.0.1:8888;
        keepalive 1024;
}

server {
    listen       80;
    server_name  [도메인];

    location / {
        return 301 https://[도메인]$request_uri; ## HTTPS로 리다이렉팅
        }
    error_page  404              /404.html;
    error_page   500 502 503 504  /50x.html;
    location = /50x.html {
        root   /usr/share/nginx/html;
    }
    location ~ /\.ht {
        deny  all;
    }
}

server {
    listen 443 ssl http2;
    listen [::]:443 http2;
    server_name [도메인];
    #ssl on;
    ssl_certificate /etc/letsencrypt/live/[도메인]/fullchain.pem;
    ssl_certificate_key /etc/letsencrypt/live/[도메인]/privkey.pem;
    ssl_dhparam /etc/ssl/certs/dhparam.pem;
    ssl_session_cache shared:SSL:1m;
    ssl_session_timeout 1440m;
    ssl_buffer_size 8k;
    ssl_protocols TLSv1 TLSv1.1 TLSv1.2;
    ssl_ciphers 'kEECDH+ECDSA+AES128 kEECDH+ECDSA+AES256 kEECDH+AES128 kEECDH+AES256 kEDH+AES128 kEDH+AES256 DES-CB
C3-SHA +SHA !aNULL !eNULL !LOW !kECDH !DSS !MD5 !EXP !PSK !SRP !CAMELLIA !SEED';
    ssl_prefer_server_ciphers on;
    ssl_trusted_certificate /etc/letsencrypt/live/[도메인]/chain.pem;
    ssl_stapling on;
    ssl_stapling_verify on;
        access_log  /var/log/nginx/web.access.log  main;
        error_log /var/log/nginx/web.error.log;

        location / {

	proxy_pass http://nextcloud/;
	proxy_http_version 1.1;
	proxy_set_header X-Forwarded-For $proxy_add_x_forwarded_for;
	proxy_read_timeout 1d;
	proxy_set_header        Host                $http_host;
	proxy_set_header        X-Real-IP           $remote_addr;
	proxy_set_header        X-Forwarded-For     $proxy_add_x_forwarded_for;
	proxy_set_header        X-Forwarded-Proto   $scheme;

}
        error_page  404              /404.html;
        error_page   500 502 503 504  /50x.html;
        location = /50x.html {
        root   /var/www/html;
        }
    location ~ /\.ht {
    deny all;
    }
}
방화벽 설정부분은 앞서 진행했던 GCP 네트워크 방화벽(443)을 오픈해주시면 되겠습니다.
자동으로 nextcloud까지 리버스 프록시를 적용하였으나 아래처럼 오류가 뜨게됩니다.
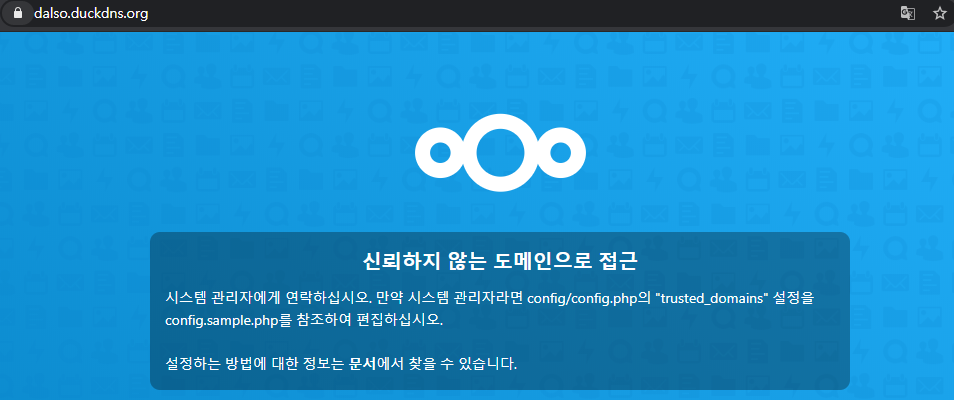
vi /data/nextcloud/config/www/nextcloud/config/config.php
에 접속한 후 아래처럼 변경해줍니다.
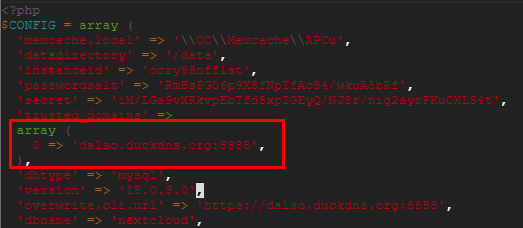
, 다음 엔터를 치고
‘[도메인]’, 를 추가시켜줍니다.
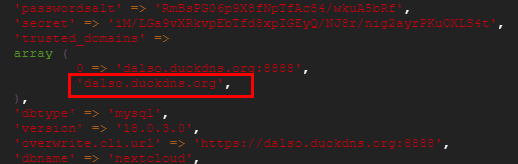
그리고 다시 dalso.duckdns.org 로 접근해보면 문제없는걸 확인할 수 있습니다.
후.. 이번포스팅하면서 가장 문제가 많이발생했던거같습니다.
진행하면서 문제 발생시 댓글남겨주세요.
진행 순서
- [GCP]VM인스턴스 생성하기(Ubuntu OS)
- [GCP]VM 인스턴스 고정 IP할당 및 Nginx 설치.
- [GCP]VM(ubuntu OS) Docker 설치하기.(portainer 추가)
- [GCP]서비스 운영을 위한 무료 도메인 발급받기
- [GCP]Docker를 이용한 Torrent 서비스 구축하기.
[GCP]Docker를 이용한 Nextcloud 서비스 구축하기.(MariaDB 추가)[GCP]Nextcloud 설정 변경하기 및 도메인 SSL,reverse proxy 적용하기.- [GCP]Nextcloud 설치를 위한 PHP, MariaDB 설치하기 + SSL 적용.
- [GCP]LEMP 스택으로 Nextcloud 구축.
- [GCP]Nextcloud 최적화하기(nginx,php-fpm 설정)
- [GCP]Docker를 이용한 Jellyfin 서비스 구축하기.
- [GCP]Docker를 이용한 PLEX 서비스 구축하기.
- [GCP]Nextcloud를 이용해 Webdav 사용하기.
혹시 이 글 제목에 줄이 그어진 이유가 따로있나요?
Ubuntu 20.04 LTS에서 시도하고있는데 도커 & Potainer & DB & NginX까지는 설치했는데 conf 파일 문제인지.. 리버스 프록시 설정이 문제인지..
nextcloud를 도커가 아닌 nginx+php+mariadb로 설치하시는걸 추천드립니다.. 인증서가 끼면 골치아파지더라구요…
nginx -> php -> mariaDB -> docker nextcloud 로 설치 한다는 말씀이신가요?
그리고 도메인으로 접속시 외부접속이 되나요??
외부접속도 가능합니다.
개인적으로는 docker nextcloud 보다 다 개별적으로 진행하는게 좋습니다.